
Appetizers
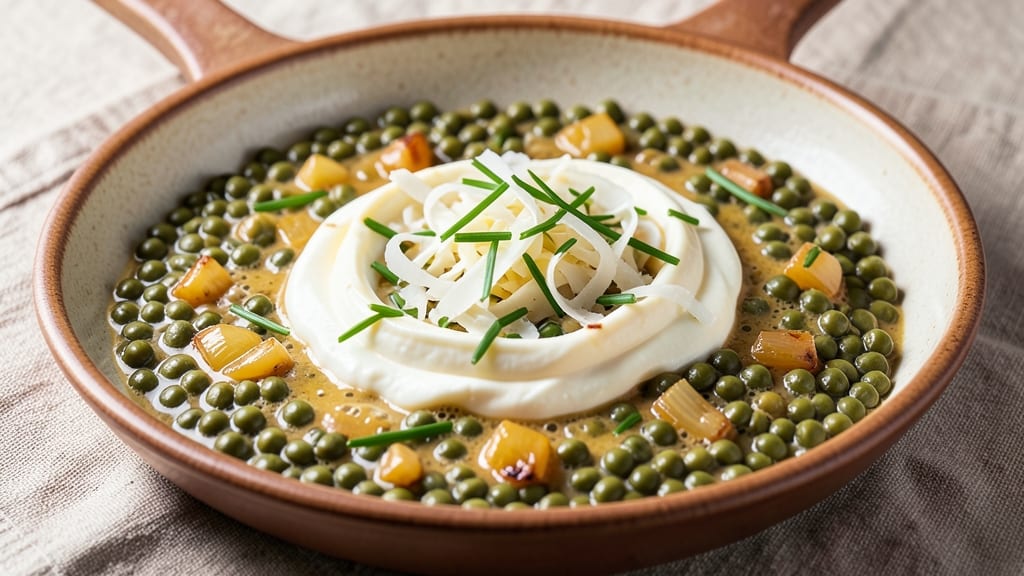
This cheese and peas recipe delivers the perfect balance of crispy golden cheese topping and creamy swirls of split pea sauce—all in one pan. After years of testing variations, I've perfected a method that transforms simple ingredients into a restaurant-worthy vegetarian dish that's surprisingly easy to master.
The secret lies in the two-stage baking process that creates that coveted crispy crust while keeping the peas tender and flavorful beneath.
What makes this recipe stand out is its versatility—it works as both a hearty appetizer and a satisfying main course. The split peas develop a rich, earthy flavor as they simmer, while the cheese topping adds a satisfying crunch that disappears with each bite.
With just 15 minutes of prep and 45 minutes in the oven, you'll have a dish that feels indulgent yet requires minimal effort. The creamy texture comes from a simple blend of cream cheese and sharp cheddar, while the crispy topping gets its structure from a light breadcrumb mixture.
By the time it comes out of the oven, you'll have a dish that looks like it belongs on a fine-dining menu—golden cheese topping with crispy edges, creamy split pea sauce peeking through, and a rich aroma that fills your kitchen.
The peas stay perfectly tender while absorbing all the savory flavors, creating a texture that's both hearty and comforting. This is the kind of recipe that transforms a simple weeknight dinner into something special without requiring advanced techniques.
Serve it warm with a side salad or crusty bread to soak up every last bit of that creamy sauce. The combination of textures and flavors makes this dish equally perfect for potlucks, family dinners, or when you're craving something vegetarian that still feels satisfying.
Here's how to make it come together perfectly every time.
Ingredients for cheese peas
Simple ingredients that transform into a restaurant-worthy vegetarian dish with crispy cheese topping and creamy pea sauce.
| Ingredient | Amount | Notes |
|---|---|---|
| Dry Green Split Peas 🌱 | 1 ½ cups | Uncooked, rinsed thoroughly |
| Vegetable Broth 💧 | 2 cups | Low-sodium preferred |
| Yellow Onion 🧅 | 1 whole | Diced finely for even cooking |
| Garlic Cloves 🧄 | 3 cloves | Minced for aromatic base |
| Cream Cheese 🧈 | 8 oz | Full-fat for creamy texture |
| Sharp White Cheddar Cheese 🧀 | 1 cup | Shredded, aged for tang |
| Breadcrumbs 🍞 | 1 cup | Panko for extra crispiness |
| Extra-Virgin Olive Oil 🫒 | ¼ cup | For crispy topping |
| Dried Thyme 🌿 | 1 tsp | Or 1 tbsp fresh thyme |
| Ground Black Pepper 🌶️ | ½ tsp | Freshly ground preferred |
| Sea Salt 🧂 | 1 tsp | Adjust to taste |
| Fresh Parsley 🌿 | ¼ cup | Chopped for garnish |
| Heavy Cream 🥛 | ¼ cup | For extra creaminess |
The split peas are the foundation—Bob's Red Mill or Anthony's Goods brands deliver the most consistent texture. Look for vibrant green peas with no brown spots, as they cook faster and stay tender. The vegetable broth should be low-sodium to control seasoning, and Imagine or Pacific Foods brands are reliable choices. Fresh thyme adds depth, but if you're using dried, make sure it's from a glass jar (not plastic packets) for maximum flavor. The sharp white cheddar makes all the difference—Cabot or Tillamook are excellent choices, but any aged cheddar with visible crystals works.
No vegetable broth? Water plus 1 tsp soy sauce works in a pinch, though the flavor won't be as rich. Substituting dried thyme? Use one-third the amount of fresh. For the breadcrumbs, panko creates extra crispiness, but regular breadcrumbs work too. The cream cheese should be full-fat for the best texture—no low-fat shortcuts here. If you're avoiding dairy, vegan cream cheese (like Kite Hill) works well, though the texture will be slightly different. The heavy cream can be swapped for coconut milk for a dairy-free option, though it will alter the flavor profile.
This dish reheats beautifully—just cover with foil and warm in the oven for 10-15 minutes. Store leftovers in an airtight container for up to 4 days, though the cheese topping loses crispiness after the first day. For best results, make a double batch and freeze portions—3 months in the freezer, thawing overnight in the fridge. The peas thicken as they cool, so add a splash of broth when reheating if needed. Garnish with fresh parsley right before serving to keep it vibrant.
Why You'll Love This Recipe
- One-Pot Magic: I swear by this recipe—just toss everything in one pot, stir occasionally, and walk away. No fancy techniques, no extra bowls, and the peas soften right into that creamy, dreamy texture.
- Creamy Garlic Hug: That creamy cheese swirled into split peas? It’s like a warm, garlicky embrace in a bowl. The onion adds sweetness, the broth keeps it rich but not heavy, and honestly? It’s the kind of dish that makes you go back for seconds without thinking.
- Meal Prep MVP: Between us, this is my go-to for busy weeks. Make a big batch on Sunday, and you’ve got lunch or dinner covered all week—just reheat and serve. My kids even ask for it (yes, even on a Tuesday night).
- Budget-Friendly Luxury: Dry split peas and onion are dirt cheap, but the cream cheese and garlic make it feel fancy. I’ll be real: it’s the kind of meal that tricks people into thinking you spent hours cooking when really, you just saved money and time.
Step-by-step instructions for cheese and peas recipe
Here’s how to create a dish with a golden, crispy topping and velvety cheese swirls—all in one pan.
Sauté Onions and Garlic for Flavor
Heat the 0.25 cup extra-virgin olive oil in a large oven-safe skillet over medium heat. Add the 1 whole yellow onion, diced finely, and cook for 5-6 minutes until softened and translucent. I stir occasionally to prevent browning—this ensures even cooking without burning.
Lower the heat to medium-low and add the 3 cloves garlic cloves, minced. Cook for 30 seconds until fragrant—you’ll smell that aromatic punch that sets the stage for the dish. Remove the skillet from heat temporarily while you prepare the split peas.
Simmer the Peas in Broth
Return the skillet to medium heat and add the 1.5 cups dry green split peas and 2 cups vegetable broth. Bring to a boil, then reduce heat to low and let it simmer for 20-25 minutes until the peas are tender but still hold their shape. Stir occasionally to prevent sticking—this is where the peas absorb the broth and soften just right.
Season with 1 tsp dried thyme, 0.5 tsp ground black pepper, and 1 tsp sea salt. Taste and adjust the seasoning—this is your base flavor, so don’t skip it. The peas should be fully cooked but not mushy; they’ll continue softening as the dish bakes.
Add Cheese and Top with Breadcrumbs
Reduce the heat to low and stir in the 8 oz cream cheese until fully melted and smooth. The mixture will thicken slightly—this is where the dish starts to come together. Next, fold in the 1 cup shredded sharp white cheddar cheese and 0.25 cup heavy cream until evenly distributed.
Spread the mixture evenly in the skillet, then sprinkle the 1 cup breadcrumbs over the top. Drizzle the remaining 0.25 cup extra-virgin olive oil evenly over the breadcrumbs for extra crispiness. The breadcrumbs should look golden and inviting—this is your crispy topping, so don’t skimp on the oil.
Bake Until Golden and Bubbly
Transfer the skillet to a preheated 375°F oven and bake for 15-20 minutes until the breadcrumb topping is deep golden brown and the cheese underneath is bubbling. The edges should look crispy, and the center should be just set—this ensures the peas stay tender while the topping gets perfectly crunchy.
Keep an eye on it after 15 minutes—ovens vary, and you want that topping to crisp up without burning. If it browns too quickly, tent loosely with foil for the last few minutes. The dish is done when the cheese is fully melted and the breadcrumbs are crispy all over.
Garnish and Serve Warm
Remove the skillet from the oven and let it rest for 2-3 minutes—this helps the cheese set slightly and makes it easier to serve. Sprinkle the 0.25 cup chopped fresh parsley over the top for a pop of color and freshness.
Serve immediately while the breadcrumbs are still crispy and the cheese is creamy. The contrast of textures—crunchy top, creamy peas—is what makes this dish so satisfying. Pair it with crusty bread or a simple green salad for a complete meal.
Pro Tips For Making Cheese Peas
- SOAK THE PEAS OVERNIGHT: Dry split peas cook faster, but skipping the soak means tough, mealy results—especially if you’re in a hurry. Toss them in a bowl with cold water and a pinch of salt, cover, and let them sit for at least 8 hours (or overnight). I used to rush this and ended up with peas that tasted like overworked cardboard. Trust me, the extra time makes them creamy and tender every time.
- SWEAT THE ONION LOW AND SLOW: Don’t rush the onion—high heat means burnt bits that turn bitter. Use a medium-low flame and let it cook for 8-10 minutes until it’s translucent and soft, not golden. After burning three batches, I finally realized patience here keeps the base flavor clean and sweet, so the cream cheese shines later.
- STIR IN BROTH GRADUALLY: Dumping all the broth at once dilutes the flavor and stretches the cooking time. Instead, add about a third of the total broth first, let the peas simmer until mostly tender, then add the rest in two batches. This keeps the texture thick and the taste rich—no watery, sad cheese peas here.
- USE FULL-FAT CREAM CHEESE: Low-fat or "light" cream cheese makes the peas taste like they’re missing something. Go for the full-fat stuff—it melts smoother and adds a luxurious creaminess the others can’t match. I was skeptical until I tried it; now I won’t go back. (Yes, even if you’re watching calories.)
Serving suggestions for this dish
Crusty Bread Pairing
This dish practically begs for a slice of warm, crusty bread to soak up every last bit of creamy pea sauce. I reach for a baguette-style loaf from my local bakery—look for one with a crispy exterior and soft interior.
The French Baguette from Bread Ahead (available at most grocery stores) works perfectly. Tear it into chunks and serve alongside the cheese peas so everyone can build their own crispy-cheesy bites. 🥖
Simple Green Salad
A bright green salad balances the richness of the creamy peas beautifully. Toss 4 cups mixed greens (I use organic spring mix from Earthbound Farm) with 1 tbsp lemon vinaigrette (mix 2 tbsp olive oil with 1 tbsp lemon juice and a pinch of salt).
Add ¼ cup sliced cucumber and 2 tbsp toasted walnuts for crunch. The acidity cuts through the richness while adding freshness to each bite.
Tangy Pickled Vegetables
For a palate-cleansing contrast, serve quick-pickled vegetables on the side.
Thinly slice 1 cup red onion and 1 cup radishes, then soak in a mixture of ½ cup apple cider vinegar, ½ cup water, 1 tbsp sugar, and 1 tsp salt for at least 30 minutes.
The tangy crunch balances the richness of the cheese and peas perfectly. I like to make a big batch and keep it in the fridge for up to 2 weeks—it’s great for so many dishes!
Warm Dinner Rolls
If you're serving this as a main course, warm dinner rolls elevate the meal to restaurant quality. I use homemade or store-bought rolls (like Pepperidge Farm Soft Dinner Rolls) and warm them in the oven for 5-7 minutes at 350°F.
Brush the tops with garlic butter (melt 2 tbsp butter with 1 minced garlic clove) for extra flavor. The soft, buttery rolls provide the perfect contrast to the crispy cheese topping. 🍞
Cheese Board Add-On
For a more indulgent presentation, set out a small cheese board with complementary cheeses and accompaniments. Include aged cheddar (like Point Reyes), goat cheese, and crackers. Add dried apricots, walnuts, and a drizzle of honey for a sweet contrast.
This turns your cheese peas into the star of a full vegetarian spread, perfect for gatherings or special dinners.
Extra Crispy Topping
If you love that crispy cheese topping, serve it as a standalone appetizer with toothpicks for easy grabbing. Cut the baked dish into small squares and arrange on a platter. The contrast of the creamy peas and crispy cheese makes it irresistible as a finger food.
I like to serve this at parties or game days—it disappears fast! The remaining peas can be reheated as a side dish later in the week. ✨
Nutrition facts
Frequently asked questions
Can I use frozen peas instead of split peas?
While you can use frozen peas, they won't provide the same rich, creamy texture as split peas. Split peas break down during cooking, creating a thick, hearty base. If you must substitute, use 2 cups frozen peas and add them during the last 5 minutes of simmering to avoid mushiness. The dish will be lighter but still delicious!
How do I prevent the breadcrumb topping from getting soggy?
Bake the dish at 375°F until the topping is deep golden brown—this ensures crispiness. For extra insurance, sprinkle the breadcrumbs in two layers with an additional 1 tbsp olive oil between them. Also, avoid opening the oven door early, as moisture from the peas can make the topping soft. Let it rest 2-3 minutes before serving.
Can I make this dish ahead of time?
Assemble the dish up to 24 hours ahead and refrigerate uncovered. When ready to bake, add 5-10 minutes to the baking time to crisp the topping. For freezing, bake the dish fully, then cool completely before wrapping tightly in foil. Reheat in a 350°F oven for 15-20 minutes, covered with foil, then uncover for the last 2 minutes to revive crispiness.
What cheese works best for this recipe?
Aged sharp white cheddar is ideal, but any melty cheese like Monterey Jack or Gruyère works well. For extra creaminess, blend ½ cup cream cheese into the pea mixture. Avoid pre-shredded cheese—it contains anti-caking agents that prevent proper melting. Freshly grated cheese creates a smoother, more luxurious texture.
Why did my peas turn out mushy?
Overcooking or using too much liquid causes mushy peas. Stick to the 20-25 minutes simmering time and use only 2 cups broth. If the mixture seems too thick, add 1-2 tbsp broth at a time. Also, avoid stirring too vigorously—gentle stirring prevents breaking down the peas. For extra texture, add ½ cup diced carrots or celery to bulk up the dish.