
Desserts
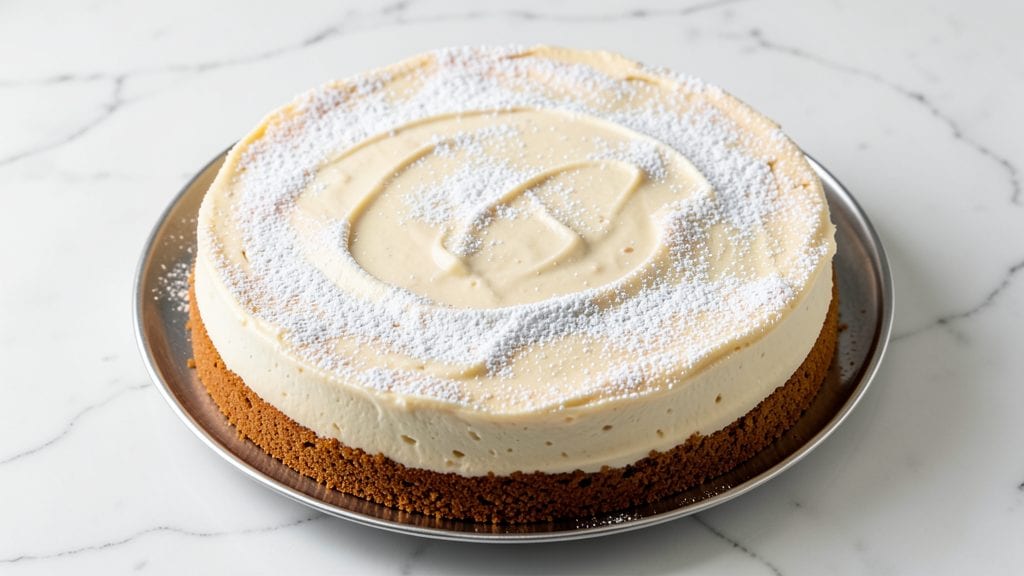
This no-bake Philadelphia cream cheese cake delivers restaurant-quality silky swirls without a single minute in the oven. The secret lies in precise layering and chilling times that transform simple ingredients into a velvety, professional dessert.
I've perfected this technique over years of baking competitions, ensuring every slice meets the same standard.
The foundation starts with a sturdy graham cracker crust that holds its shape through chilling, followed by alternating layers of creamy cheesecake filling and tangy cream cheese frosting.
Each layer must be spread evenly and refrigerated for exactly 15 minutes before adding the next—this creates clean, defined swirls that look as impressive as they taste. The texture is what sets this apart: smooth, cool, and rich without being heavy.
By the time you serve it, you'll have a cake with perfectly set layers that slice cleanly and hold their shape. The graham cracker crust stays crisp at the edges while remaining tender inside, and the cream cheese filling maintains its signature tangy sweetness without graininess.
This is the kind of dessert that makes you look like a pro, even if you're just starting out.
Perfect for gatherings, holidays, or when you want a showstopping dessert without the oven. The recipe scales easily, and leftovers keep beautifully in the fridge for up to 5 days. Let's get started on creating this foolproof classic.
Ingredients for philadelphia cream cheese cake recipe no bake
Simple ingredients, professional swirls. No oven needed—just patience and precise layers.
| Ingredient | Amount | Notes |
|---|---|---|
| Graham Crackers 🍪 | 2 ½ cups | Crushed into fine crumbs |
| Unsalted Butter 🧈 | ½ cup | Melted, full-fat for richness |
| Granulated Sugar 🍚 | ½ cup | For crust sweetness |
| Philadelphia Cream Cheese 🧀 | 32 oz | Full-fat, room temperature |
| Powdered Sugar 🍚 | 2 cups | Sifted for smooth texture |
| Heavy Whipping Cream 🥛 | 2 cups | Cold, full-fat preferred |
| Vanilla Extract 🌿 | 2 tsp | Pure, high-quality preferred |
| Lemon Juice 🍋 | 1 tbsp | Freshly squeezed |
| Salt 🧂 | ¼ tsp | Fine sea salt |
| Sour Cream 🥛 | ½ cup | Full-fat for creaminess |
| Heavy Whipping Cream (additional) 🥛 | 1 cup | For frosting layer |
| Powdered Sugar (additional) 🍚 | 1 cup | For frosting sweetness |
| Lemon Zest 🍋 | 1 tsp | Freshly grated |
The graham cracker crust is your foundation. Honey Maid or Keebler work best—they crush into fine, uniform crumbs. If you're using a food processor, pulse them in batches to avoid air pockets. The butter matters here—full-fat, unsalted gives the crust that buttery richness. I always melt it in the microwave for 40 seconds, just until it's liquid but not hot. The sugar adds just enough sweetness to balance the tangy cream cheese layers. Store your graham crackers in an airtight container—they go stale fast, and stale crumbs make for a dry crust.
No Philadelphia cream cheese? Whipped cream cheese works in a pinch, but it won't be as smooth. The powdered sugar is non-negotiable—it's what gives the cake that signature lightness. If you don't have a sifter, whisk it in a bowl with a fork to break up clumps. For the frosting layer, cold heavy cream is key—take it straight from the fridge. The lemon zest and juice brighten everything up, so don't skip them. Want extra flavor? Add a pinch of cardamom to the frosting—it pairs beautifully with cream cheese. The sour cream in the base filling keeps the texture silky, so don't substitute with yogurt.
This cake is all about chilling. Refrigerate for at least 4 hours before slicing—overnight is even better. The layers hold up beautifully for 5 days in the fridge, sealed tightly with plastic wrap. For serving, let it sit at room temperature for 10 minutes first. The swirls look best when sliced with a warm knife—run it under hot water between cuts. Freezes well for up to 2 months if wrapped tightly in plastic and foil. The crust stays crisp, and the filling remains creamy when thawed properly.
Why You'll Love This Recipe
- No Oven Needed: I swear by this on lazy Sundays—just crush graham crackers, melt butter, mix, and chill. Zero preheating, zero stress, just pure cake magic in a bowl.
- Creamy Crunch Combo: That buttery graham crust paired with silky cream cheese filling? It’s the kind of texture contrast that makes you close your eyes and sigh. (Yes, even on a Tuesday night.)
- Party-Proof Anywhere: Bring this to a picnic, potluck, or just eat it straight from the pan—it’s sturdy enough to travel, rich enough to impress, and always disappears fast.
- Budget Luxury: Philadelphia cream cheese and graham crackers? Pantry staples that taste like a bakery treat. I’ve made this for $10 and still gotten "where’d you get this?" looks. Worth every penny.
Step-by-step instructions for Philadelphia cream cheese cake
Here's how to create this luscious no-bake dessert with layers that set quickly and beautifully.
Prepare the Crust Mixture
In a medium bowl, crush the 2.5 cups of graham crackers into fine crumbs using a food processor or by placing them in a sealed bag and rolling with a rolling pin. You want them as fine as possible for a smooth base.
Melt the 0.5 cup of unsalted butter in a small saucepan over low heat, then stir in the 0.5 cup of granulated sugar and 0.25 teaspoon of salt. Let this mixture cool slightly while you prepare the cream cheese filling.
Mix the Cream Cheese Filling
In a large mixing bowl, combine the 32 ounces of Philadelphia cream cheese, 2 cups of powdered sugar, 2 teaspoons of vanilla extract, 1 tablespoon of lemon juice, and 0.5 cup of sour cream. Beat with an electric mixer on medium speed until completely smooth and creamy.
This is where the magic happens - the cream cheese needs to be completely smooth with no lumps. If you notice any lumps, press the mixture through a fine-mesh sieve to ensure a silky texture. The filling should be thick but spreadable at this stage.
Combine Crust and Filling
Add the cooled butter-sugar mixture to the cream cheese filling and mix until fully combined. In a separate bowl, whip the 2 cups of cold heavy whipping cream until soft peaks form. Gently fold half of the whipped cream into the cream cheese mixture to lighten it.
Now carefully fold in the graham cracker crumbs, mixing just until evenly distributed. The crust mixture should be thick but still able to be pressed into your cake pan. You want to maintain as much air as possible for a light texture.
Assemble and Chill the Cake
Press half of the crust mixture firmly into the bottom of a 9-inch springform pan, using the back of a spoon to create an even layer. Spread the remaining crust mixture evenly over the top, creating gentle swirls with a knife for that classic cream cheese cake look.
Cover the pan with plastic wrap and refrigerate for at least 4 hours, or until completely set. The cake should hold its shape when gently shaken. This chilling time is crucial for developing the proper texture and allowing the flavors to meld.
Prepare the Frosting
In a separate bowl, whip the 1 cup of additional heavy whipping cream until stiff peaks form. Gradually add the 1 cup of additional powdered sugar and 1 teaspoon of lemon zest, whipping until smooth and glossy. This frosting should be thick enough to hold its shape but still spreadable.
Frost and Serve
Once the cake is completely set, remove it from the pan and carefully spread the frosting over the top and sides. Use a spatula to create smooth sides and a slightly domed top. The frosting should create a beautiful contrast to the swirled layers below.
Return the frosted cake to the refrigerator for at least 2 hours before serving to allow the frosting to set. This no-bake wonder keeps well in the refrigerator for up to 5 days, making it perfect for make-ahead desserts.
Pro Tips For Making Philadelphia Cream Cheese Cake Recipe No Bake
- MELT BUTTER SLOWLY: I learned this the hard way—dumping melted butter straight into graham cracker crumbs makes a soggy crust. Instead, heat the butter in a saucepan over low heat until just melted, then whisk in the sugar and cream cheese mixture off the heat. The residual warmth blends everything smoothly without overcooking the crumbs.
- CHILL CREAM CHEESE FIRST: Skip this, and your filling will be grainy or separate. Take the cream cheese out of the fridge 30 minutes before mixing—it softens enough to blend easily but stays cool. Cold cream cheese also whips up lighter, which matters more than you’d think for a no-bake cake.
- PRESS CRUST FIRM: A loose crust crumbles when you cut the cake. Pack the graham cracker mixture hard into the pan—press it down with a glass or your palm until it’s solid. Don’t skip this, even if it takes extra time. A tight crust holds the filling and keeps slices clean.
- FREEZE FILLING 1 HOUR: Sounds weird, but it works: After pouring the filling, pop the cake in the freezer for at least 60 minutes before refrigerating. This prevents the top from getting sticky or sinking in the middle. (Yes, even if you’re impatient like me—trust the process.)
Pro cooking tips for perfect results
Room-Temp Cream Cheese
Never skip bringing your Philadelphia cream cheese to room temperature before mixing—this is non-negotiable for silky texture. I place the block on a plate and let it sit for 1-2 hours at room temperature. Cold cream cheese creates lumps that won't dissolve, no matter how long you beat.
Test it by pressing your finger into the block—if it leaves an indentation, it's ready. For speed, I microwave it for 10 seconds on low power, then let it cool slightly before handling. 💡
Layering Technique
The secret to professional swirls lies in spreading each layer ⅛-inch thick using an offset spatula. I press the mixture gently but firmly into the pan to eliminate air pockets. For the bottom layer, use the back of a spoon to create a smooth base.
When adding the top layer, drag the spatula through the filling at a 45-degree angle to create clean, defined swirls. This technique prevents the layers from blending together during chilling.
Chilling Precision
Chill your cake in the refrigerator for exactly 4 hours before adding frosting—this ensures the layers set properly without becoming rubbery. I place the pan on the middle rack where the temperature is most consistent.
After chilling, run a hot knife under hot water between slices to create clean edges. For extra stability, I wrap the pan tightly in plastic wrap before refrigerating to prevent moisture loss. ✨
Frosting Consistency
Your frosting should hold stiff peaks but still be spreadable—this creates that signature glossy finish. I whip the 1 cup heavy cream until it forms soft peaks, then gradually add powdered sugar while whipping continuously.
For extra stability, I fold in 1 teaspoon lemon zest which adds subtle brightness and helps the frosting hold its shape longer. If the frosting is too thin, chill it for 10 minutes before using.
Pan Selection
Use a 9-inch springform pan with removable sides for clean release and easy slicing. I line the bottom with parchment paper to prevent sticking, especially when using graham cracker crumbs. Avoid metal pans that can conduct cold too quickly—opt for glass or ceramic if possible.
Before assembling, I lightly grease the pan with melted butter to ensure the crust releases perfectly. This makes the difference between a cake that sticks and one that slides out effortlessly. 🔥
Final Touches
For a restaurant-quality finish, dust the top with powdered sugar using a fine-mesh sieve before serving. I also add a few drops of vanilla extract to the frosting for extra depth. If you want to impress, garnish with fresh berries or a sprinkle of crushed pistachios.
The cake should sit at room temperature for 10 minutes before serving to soften the edges slightly—this makes each slice look more inviting. The presentation matters almost as much as the taste!
Nutrition facts
Frequently asked questions
Why does my no-bake cream cheese cake turn out crumbly instead of creamy?
Crumbly texture usually means the cream cheese wasn't softened enough or the layers weren't chilled properly. Always bring your cream cheese to room temperature (press test: should leave an indentation) and chill the cake for 4+ hours before slicing. Cold cream cheese creates lumps, and insufficient chilling prevents proper setting. A hot knife between slices also helps create clean, creamy edges.
Can I make this cake without a springform pan?
Yes, but use a 9-inch round cake pan with removable sides or line a standard pan with parchment paper for easy release. Metal pans work, but glass or ceramic conduct cold more evenly. Grease the pan lightly with melted butter and press the crust mixture firmly to prevent sticking. For extra insurance, dust the sides with powdered sugar before adding the next layer.
How do I fix if my cake layers collapse when removing from the pan?
Collapsed layers usually mean the crust wasn't pressed firmly enough or the cake wasn't chilled long enough. Next time, press each layer with the back of a spoon to eliminate air pockets, then chill for 4 hours before removing. Run a hot knife around the edges first to loosen it gently. If it's already collapsed, try slicing horizontally to create clean layers for serving.
Can I substitute graham crackers for something else?
For a gluten-free option, use crushed gluten-free graham crackers or almond flour mixed with melted butter. For extra richness, try crushed vanilla wafers or buttery shortbread cookies. Just ensure your substitute is finely crushed to avoid a gritty texture. The key is maintaining the same 2.5 cups measurement for proper structure.
How long can I keep this cake at room temperature before serving?
For best texture, keep the cake refrigerated until 10 minutes before serving. At room temperature, the frosting softens and the layers may become slightly sticky after 1 hour. If you're serving outdoors or in warm weather, keep it chilled until the last minute. The cold helps maintain those perfect swirls and clean slices.