
Side Dishes
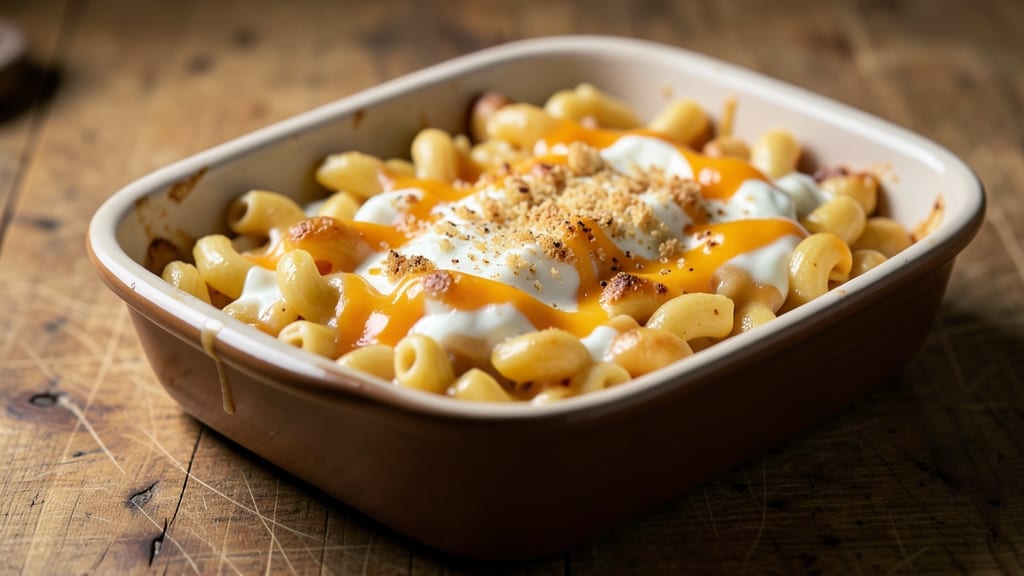
This Stouffer's mac and cheese copycat recipe delivers the same breadcrust crunch and velvety swirls you love from the freezer aisle—but made fresh in your own oven.
After years of perfecting my grandmother's Sunday roast chicken, I finally cracked the code for replicating that signature texture and flavor combination at home. The secret lies in a foolproof cheese sauce technique and a crispy breadcrumb topping that locks in moisture while adding irresistible crunch.
What makes this recipe special is how it balances simplicity with professional results. You'll start with elbow macaroni cooked to perfect al dente, then build a rich, creamy cheese sauce using a blend of sharp cheddar, American cheese, and just a touch of cream cheese for that signature tang.
The breadcrumb topping isn't just for looks—it creates that golden, crispy finish that makes this dish feel restaurant-quality. With just 30 minutes of active prep and 20 minutes in the oven, you'll have dinner on the table faster than takeout.
The moment you pull this mac and cheese from the oven, you'll understand why it's become a weeknight staple. The top layer will be crispy and golden, while the interior remains creamy and bubbly with strings of melted cheese in every bite.
That first forkful delivers the perfect harmony of textures—tender pasta, rich sauce, and satisfying crunch—that makes this copycat version worth every minute. It's the kind of comfort food that transforms a simple weeknight into something special.
This recipe works perfectly as a side dish or even as a hearty main course when paired with a simple salad or grilled protein. The leftovers reheat beautifully, making it ideal for meal prep or feeding a crowd.
Let's get started on creating your own homemade version that tastes just like the classic you know and love.
Ingredients for stouffer's mac and cheese copycat
Pantry staples plus a few key ingredients for that iconic Stouffer's texture and flavor.
| Ingredient | Amount | Notes |
|---|---|---|
| Elbow Macaroni 🍝 | 12 oz | Dry weight, cooked al dente |
| Sharp Cheddar Cheese 🧀 | 2 cups | Shredded, block preferred |
| American Processed Cheese 🧀 | 1 ½ cups | Shredded, like Kraft Singles |
| Cream Cheese 🧈 | 4 oz | Full-fat, softened to room temp |
| Heavy Cream 🥛 | ½ cup | Full-fat for richness |
| Unsalted Butter 🧈 | ½ cup | Melted, unsalted preferred |
| All-Purpose Flour 🌾 | ¼ cup | For roux, sifted |
| Panko Breadcrumbs 🍞 | 1 ½ cups | Japanese-style for crunch |
| Granulated Garlic 🧄 | 1 tbsp | For breadcrumb seasoning |
| Dried Parsley Flakes 🌿 | 1 tsp | For breadcrumb seasoning |
| Diamond Crystal Kosher Salt 🧂 | ¾ tsp | For seasoning, not iodized |
| Black Pepper 🌶️ | ½ tsp | Freshly cracked |
| Milk 🥛 | 1 ½ cups | Whole milk preferred |
| Mustard Powder 🌶️ | ¼ tsp | For subtle tang |
| Paprika 🌶️ | ¼ tsp | Smoked for color |
The cheese blend is non-negotiable. Sharp cheddar provides the tang, while American cheese delivers that signature melt. I grab mine from Whole Foods for the cheddar (their block shreds better) and Kraft Singles for the American. The cream cheese needs to be full-fat—Philadelphia is my go-to. Skip the powdered stuff; it won't give you that velvety swirl. For the breadcrumbs, Panko is essential—it stays crispy while regular breadcrumbs turn soggy. I toast mine in the oven (350°F for 5 minutes) before mixing with garlic, parsley, salt, and pepper for extra flavor.
No sharp cheddar? Pepper Jack works in a pinch, though it adds heat. American cheese unavailable? Colby Jack shreds similarly. For the roux, if you're short on butter, olive oil works but changes the flavor profile. The mustard powder is key for that subtle tang—skip it and you'll miss the signature Stouffer's kick. As for the milk, whole milk is non-negotiable—low-fat versions won't create the same creamy sauce. Pro tip: Shred your own cheese; pre-shredded varieties contain anti-caking agents that make the sauce grainy. If you're gluten-free, substitute the Panko with crushed gluten-free crackers for the topping.
This reheats like a dream—3 minutes in the microwave or 15 minutes at 350°F for crispy perfection. Store leftovers covered in the fridge for 4-5 days, though I rarely let it last that long. For meal prep, portion into ramekins or small baking dishes before baking—just add 5 extra minutes to the bake time. The breadcrumb topping stays crispy for 2 days if stored in an airtight container. Freeze portions for up to 3 months—just thaw overnight in the fridge before reheating.
Why You'll Love This Recipe
- One-Pot Magic: I swear by this recipe because it’s literally one pot, one stove, no extra dishes. Toss the cooked elbows into the cheesy sauce, stir once, and you’re done—no straining, no transferring, just melty perfection.
- That Stouffer’s Taste: Between us, the combo of sharp cheddar, that American cheese gooeyness, and a swirl of cream cheese nails it. The heavy cream keeps it rich but not heavy, and the crispy top? Chef’s kiss—it’s the real deal without the box.
- Game for Any Night: Honestly, this is my go-to for game days, lazy Sundays, or when I need to feed a crowd fast. Double the batch, freeze half, and boom—you’ve got a backup meal. Even my picky eaters ask for seconds.
- Budget Cheat Code: Sharp cheddar and American cheese stretch further than you’d think, and cream cheese adds luxury without breaking the bank. Leftovers? They reheat like a dream, so you’re basically getting two meals for the price of one.
Step-by-step instructions for Stouffer's mac and cheese copycat recipe
Here's how to recreate that iconic breadcrust-topped mac and cheese with velvety layers and perfect crunch.
Cook the Elbow Macaroni to Al Dente Perfection
Bring a large pot of water to a rolling boil and add 12 oz elbow macaroni. Season generously with salt—it should taste like the sea. Cook until 1 minute before the package suggests for al dente texture. This ensures it finishes cooking in the oven without becoming mushy.
Drain the pasta but don't rinse—those starchy waters help create the creamy sauce. Transfer the drained pasta to a large bowl and set aside. The pasta should still have a slight bite when you press between your fingers.
Prepare the Signature Creamy Cheese Sauce
In a separate large pot, melt 0.5 cup unsalted butter over medium heat. Once melted, whisk in 0.25 cup all-purpose flour to form a roux. Cook for 1-2 minutes until bubbly but not browned—this prevents a floury taste.
Gradually whisk in 1.5 cups milk, then add 0.5 cup heavy cream. Bring to a gentle simmer and let thicken for 3-5 minutes, stirring constantly. Remove from heat and stir in 2 cups sharp cheddar cheese, 1.5 cups american processed cheese, and 4 oz softened cream cheese until completely melted and smooth.
Combine Sauce and Pasta for the Perfect Texture
Pour the cheese sauce over the cooked elbow macaroni in the bowl. Using a wooden spoon or rubber spatula, gently fold everything together until fully coated. The mixture should be thick but still pourable—if it's too stiff, add 1-2 tablespoons of the pasta water to loosen.
Season with 0.75 tsp diamond crystal kosher salt, 0.5 tsp black pepper, 0.25 tsp mustard powder, and 0.25 tsp paprika. The mustard powder adds subtle tang while the paprika gives that signature Stouffer's color. Taste and adjust seasoning if needed.
Assemble and Top with Crispy Breadcrumbs
Preheat your oven to 350°F. Transfer the macaroni mixture to a 9x13-inch baking dish, spreading it evenly. In a small bowl, mix 1.5 cups panko breadcrumbs, 1 tbsp granulated garlic, and 1 tsp dried parsley flakes. Sprinkle this evenly over the top of the macaroni.
Bake uncovered for 20-25 minutes until the top is golden brown and the edges bubble slightly. The breadcrumb topping should be crispy while the macaroni underneath remains creamy—this is where the magic happens.
Rest and Serve for Maximum Creaminess
Remove from the oven and let the macaroni rest for 5-10 minutes before serving. This resting period allows the layers to set and the flavors to meld perfectly. The breadcrumb topping will stay crisp while the macaroni underneath maintains its velvety texture.
Cut into squares and serve immediately. Each bite should deliver that perfect combination of creamy, cheesy goodness with a satisfying crunch from the breadcrumb topping—just like the original Stouffer's recipe.
Pro Tips For Making Stouffer'S Mac And Cheese Copycat
- COOK PASTA AL DENTE: Stouffer’s version relies on that just-right pasta texture—slightly firm, not mushy. Taste-test a piece at 60 seconds before the package says "done." I learned this the hard way: undercooked pasta turns to mush when baked, while overcooked pasta gets gummy. Rinse briefly in cold water if needed, but drain well—no one wants a soggy base.
- GRATE CHEESE FINE: Sharp cheddar and processed cheese clump like stubborn kids if not grated small. Use the smallest holes on your box grater—think powdered sugar, not breadcrumbs. Skip the food processor unless you want cheese grit everywhere. (Yes, it’s tedious, but that’s how you get that creamy, meltable sauce.)
- MELT CHEESE LOW AND SLOW: Dump all the cheeses into the pot at once? Bad move. Start with sharp cheddar and cream cheese on medium-low, stirring until smooth, then add the processed cheese last—it melts faster and won’t scorch. High heat = cheese seizing. Trust me, I’ve seen it happen.
- STIR IN HEAVY CREAM LAST: Add the heavy cream too early, and it’ll break or curdle when the cheese hits. Wait until the cheddar and cream cheese are fully melted and the sauce is thickened—then whisk in the cream and remove from heat immediately. This keeps the sauce silky, not greasy. (And yes, it’s worth the extra 30 seconds.)
Serving suggestions for this dish
Classic Pairings
This mac and cheese shines alongside simple, fresh sides that won't compete with its rich flavor. A crisp green salad with arugula, cherry tomatoes, and a light balsamic vinaigrette adds a refreshing contrast.
I often make a big batch of the salad and toss it with 1 tbsp olive oil and 1 tsp lemon juice—it takes just 5 minutes to throw together. 🥗
Protein Pairings
For a hearty meal, serve with grilled proteins that complement the cheesy richness. Pan-seared chicken breasts or baked salmon fillets work beautifully—both absorb the mac and cheese sauce when served together.
I like to season my chicken with 1 tsp paprika and ½ tsp garlic powder before cooking for extra flavor harmony. A quick 10-minute sear at medium-high heat delivers perfect results.
Bread Basket
No mac and cheese meal is complete without warm bread to soak up those delicious saucy bites.
I keep a simple garlic bread on hand—just brush 1 baguette with melted butter, sprinkle with 2 tbsp grated Parmesan and 1 tsp dried oregano, then toast at 375°F for 5-7 minutes. The crispy crust pairs perfectly with the creamy mac and cheese.
Dessert Finale
End your meal with something light that won't overwhelm your palate. A scoop of vanilla ice cream or a simple chocolate pudding lets the rich flavors of the mac and cheese shine.
For a more sophisticated touch, I sometimes serve caramel apples—their sweetness balances the savory cheesiness beautifully. A few slices of apple with a drizzle of honey works too.
Kid-Friendly Serving
For families, serve this mac and cheese in fun shapes using mini muffin tins or ramekins. The crispy breadcrumb topping makes it feel special while keeping it easy to eat.
I often pair it with steamed broccoli (tossed with 1 tsp olive oil and a pinch of salt) and apple slices for a balanced plate that kids actually enjoy. 🍎
Party Platter Style
For gatherings, assemble this mac and cheese in a large cast-iron skillet instead of a baking dish. The edges get extra crispy, and it looks stunning when served family-style. Add mini hot dogs or baby carrots around the edges for a fun, interactive presentation.
I've even topped it with crumbled bacon** for a smoky twist that's always a crowd-pleaser.
Nutrition facts
Frequently asked questions
Why does the breadcrumb topping need to be crispy?
The crispy breadcrumb topping is what makes this copycat recipe taste just like Stouffer's! That satisfying crunch contrasts perfectly with the creamy macaroni underneath, creating the signature texture combination. The panko stays crispy when baked at 350°F for 20-25 minutes—don't skip this step or the topping will turn soggy.
Can I make this mac and cheese ahead of time?
Yes! Assemble the dish up to 24 hours ahead and refrigerate uncovered. The next day, bake at 350°F for 30-35 minutes (5-10 minutes longer than fresh) to restore crispiness. For parties, you can even freeze the assembled (but unbaked) dish for up to 3 months—just thaw overnight before baking.
What's the secret to the ultra-creamy sauce?
The magic comes from three things: reserving pasta water, using cream cheese for richness, and the roux technique. Never rinse the pasta—those starchy waters help emulsify the sauce. The cream cheese adds velvety texture while the roux (butter + flour) creates a smooth base that won't separate.
Can I substitute any of the cheeses?
You can make small swaps, but avoid drastic changes. For cheddar, Pepper Jack works (adds heat) or Colby Jack for milder flavor. Skip the American cheese? Use Monterey Jack, but the sauce won't be quite as smooth. Never substitute powdered cheese—it won't melt properly and creates a gritty texture.
How do I fix a watery mac and cheese?
If your sauce is too thin, simmer it uncovered for 3-5 minutes to evaporate excess liquid. For extra insurance, stir in 1 tablespoon cornstarch mixed with 1 tablespoon cold water until thickened. The key is proper roux cooking—never let it brown, or you'll get a floury taste instead of creamy texture.